When you need to mirror folder mac data to an external drive, you are looking…
Best FTP Client for Mac: 2 Easy Ways to Connect to Remote Servers

Finding a reliable FTP client for Mac can be frustrating. Apple removed built-in FTP support from Finder years ago, leaving users searching for alternatives to upload and download files from remote servers. Whether you’re a web developer pushing files to a hosting provider, a photographer delivering client galleries, or a system administrator managing multiple servers, having the right FTP client for Mac is essential for transferring files efficiently.
We’ll look at two ways to connect to remote servers and transfer files so you can get back to being productive.
Table of Contents
What’s the difference between FTP, SFTP, and other protocols?
Before choosing an FTP client for Mac, it helps to understand the protocols you might encounter:
FTP (File Transfer Protocol) is the original file transfer protocol. It’s simple and widely supported, but transmits data unencrypted—meaning your username, password, and files can potentially be intercepted. Use it only on trusted networks or for non-sensitive files.
SFTP (SSH File Transfer Protocol) transfers files over an encrypted SSH connection. It’s the modern standard for secure file transfers and is required by most professional hosting providers, cloud servers like AWS EC2, and security-conscious organizations.
Other protocols you might encounter include SMB (for Windows shares and NAS devices), AFP (legacy Apple protocol), and WebDAV (used by some cloud services).
How to connect to an FTP server on Mac using Terminal?
macOS includes built-in command-line tools that can function as a basic FTP client for Mac. For SFTP connections (the more common and secure option), you can use the Terminal application. Launch Terminal from the Applications folder, then type:
sftp username@hostnameLet’s break down this command so you can understand what it means.
sftp is the built-in secure file transfer utility.
username is your login name on the remote server. Replace this with the username provided by your hosting company or server administrator.
hostname is the server address. This could be a domain like ftp.example.com or an IP address like 192.168.1.100.
After pressing Enter, you’ll be prompted for your password. Once authenticated, you’ll see an sftp> prompt where you can run commands:
sftp> ls                    # List files on the remote server
sftp> cd public_html        # Change to a directory
sftp> lcd ~/Desktop         # Change your local directory
sftp> get filename.zip      # Download a file
sftp> put myfile.pdf        # Upload a file
sftp> bye                   # Disconnect
For traditional FTP (unencrypted), you can use the ftp command instead, though this is discouraged for anything sensitive:
ftp ftp.example.comWhile Terminal can work as a basic FTP client for Mac, it has significant drawbacks. You can’t see local and remote files side by side, there’s no drag-and-drop, you can’t queue multiple transfers, and resuming interrupted uploads requires manual intervention. For occasional single-file transfers it’s fine, but for real work you’ll want a dedicated FTP client for Mac with a graphical interface.
How to connect to FTP servers on Mac using DCommander?
A much easier way to connect to remote servers is to use DCommander, a dual-pane file manager that doubles as a powerful FTP client for Mac. Because it’s a graphical application, you can browse remote files just like local ones, drag and drop between locations, and manage transfer queues visually.
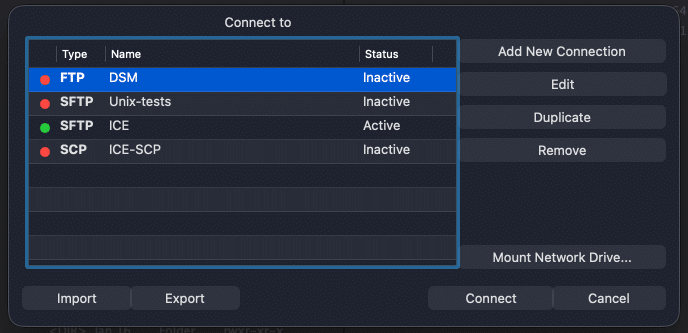
First, download and run DCommander. To connect to a remote server, click the Connection Manager button in the toolbar (or press ⌘K).
In the Connection Manager, click the + button to add a new connection and fill in the details:
- Protocol: Choose FTP or SFTP
- Server: Enter the hostname or IP address
- Port: Usually 21 for FTP, 22 for SFTP (leave blank for default)
- Username: Your login credentials
- Password: Your password
Click Connect and the remote server appears in one of DCommander’s panes. Now you can:
- Browse the remote filesystem just like a local drive
- Drag and drop files between the local pane and the remote pane
- Use keyboard shortcuts: F5 to copy, F6 to move
- Queue multiple transfers and watch progress in the Transfer Manager (⌘J)
Managing transfers with the Transfer Manager
One of DCommander’s biggest advantages over Terminal is the Transfer Manager. Open it with ⌘J or click the queue icon in the toolbar.
The Transfer Manager shows all active and completed transfers. You can:
- Stop transfers at any time
- See transfer speeds and estimated completion times
- Handle conflicts when files already exist (skip, overwrite, or rename)
- Open the target folder directly from a completed transfer
This is especially valuable when uploading large files or working over unreliable connections.
Tips for working with remote servers
Save your connections. In Connection Manager, saved connections appear in your list for one-click access. You don’t need to re-enter credentials every time.
Use tabs for multiple servers. DCommander supports tabs in each pane (⌘T to open a new tab). Keep your local project folder in one tab, your staging server in another, and your production server in a third.
Lock your destination tab. Right-click a tab and choose Lock to prevent accidentally navigating away from an important location. This is invaluable when uploading to a specific remote directory.
Verify uploads with Viewer. After uploading, select files on the remote server and press F3 to view them. This confirms the transfer completed correctly.
Conclusion
Connecting to FTP and SFTP servers doesn’t have to be complicated. While Terminal works for quick one-off transfers, using a dedicated FTP client for Mac like DCommander transforms remote file management into a visual, intuitive experience. With its dual-pane interface, transfer queue, and support for FTP and SFTP, DCommander is the ideal FTP client for Mac users who need more than just occasional transfers.
Related Posts